I released my ZX81+35 ZX-81 clone design files on Github
Posted: Sun Sep 01, 2019 1:55 am
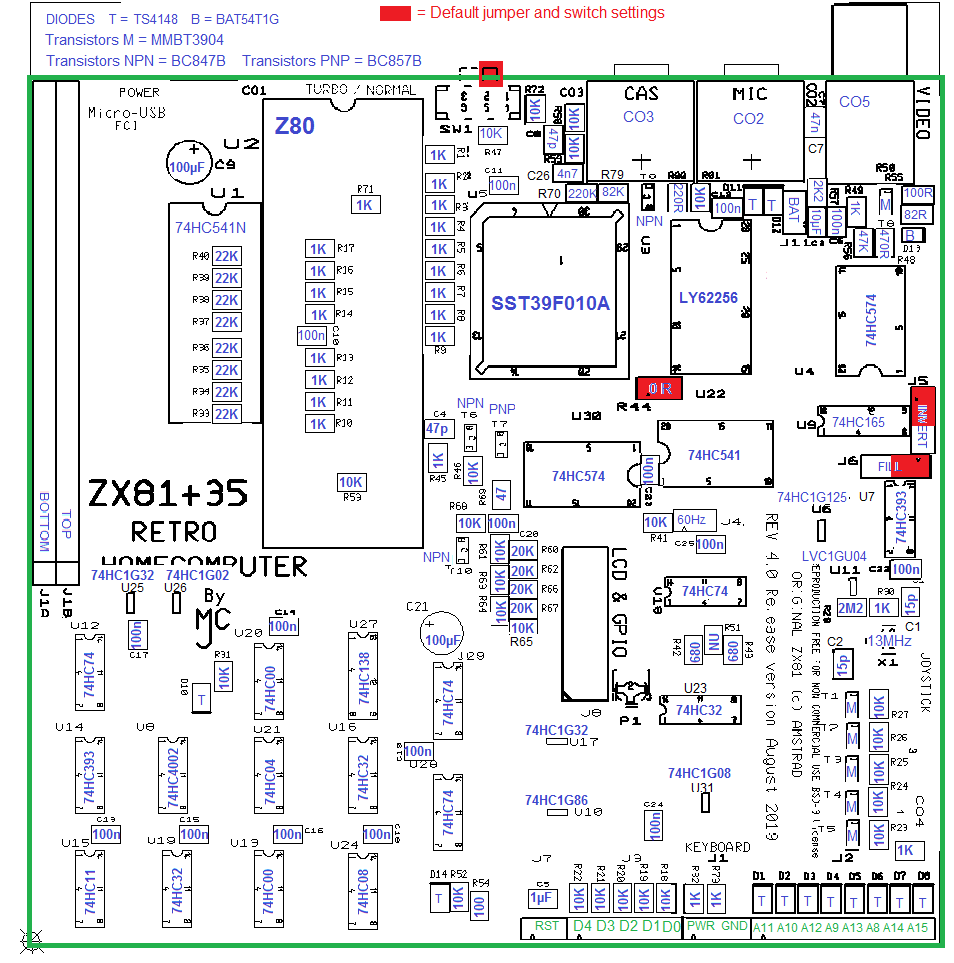
After three years I finally decided to release the design files (PCB gerber files etc) of my ZX81 clone ZX81+35 to the world at large.
You can find it, (the third major revision of it) on GitHub here: https://github.com/mahjongg2/ZX81plus35.
I stopped working on it because I wanted to develop a color home computer, I named Rhococo, the prototype of which I finished this spring, and I'm still testing it, and creating the firmware that is needed to make it functional.
But a request if I could release my ZX81+35 design brought me back to work on my ZX-81 clone.
The reason I did not release it three years ago was that I could not get its video output to co-operate with my turbo mode enhancement, it simply did not generate a stable video signal when using turbo mode, (clock speed doubling) and I lost interest in fixing the problem, so I shelved it for later.
I did debug it and designed the PCB for a third version of it though, with all the fixes I found in my second version
But in fact if you don't enable the clock doubling, my ZX81+35 should be a perfectly functional ZX-81 clone. with a digital frontend-port video fix, and improved cassette input circuitry.
I was able to load and run many ZX-81 programs on my ZX81+35 using a laptop sound output as "cassette recorder" with it.
All programs ran well, including various high-res graphics programs.
One thing I never designed for it was a keyboard PCB, my prototype keyboard, based on 6x6mm switches, was built up on a piece of euro-card sized veroboard which I hand wired, partly because the keyboard wiring is so confusing, and hand wiring can be easily fixed.
I have since acquired a real ZX-81, (and a memo tech 64K ram expansion) and using that I can triple check if my keyboard PCB interface wiring is correct.
So I'm now also designing a keyboard PCB compatible with my ZX81+35 (and hopefully also with a real ZX-81, although its PCB is upside down compared to my clone, which has its components, and keyboard connectors on the top side.
More information on my clone can be found here: https://revspace.nl/ZX81PLUS34_ZX81_clone, as well as a ZON compatible sound expansion board here: https://github.com/mahjongg2/PSG-for-ZX ... ZX81-clone
note that I never actually build a prototype of my PSG board, as I knew It would not work with my currently built prototype, (which had an upside down expansion port) so I would have to build a third ZX81+35 prototype first, with the corrections I found when testing my second prototype.
Currently my clone uses discrete CMOS chips for the ULA replacement, which means it is not a beginners project for someone attempting to make one, perhaps I should try to build an ULA replacement, and base a new version on that. I know I'm not the first with that idea, but that doesn't matter to me.